How to Clean Oil Paintings at Home Safely & Effectively
how to clean oil paintings at home

How to Clean Oil Paintings at Home Safely & Effectively

Unlock the secrets to preserving your beloved oil paintings, ensuring their beauty lasts for generations with careful, at-home cleaning.

Start Cleaning Safely

Key Takeaways

  • ✓ Always test cleaning solutions on an inconspicuous area first.
  • ✓ Never use water or harsh chemical cleaners on oil paintings.
  • ✓ Dusting with a soft, natural-bristle brush is the safest initial step.
  • ✓ Professional restoration is recommended for significant damage or valuable pieces.

How It Works

1
Assess the Painting's Condition

Before any cleaning, thoroughly inspect your oil painting for flaking paint, cracks, or signs of instability. This initial assessment dictates the safest cleaning approach and helps identify areas requiring extra caution.

2
Gather Your Gentle Cleaning Tools

Assemble soft, natural-bristle brushes, lint-free cloths, distilled water (for specific, limited uses), and specialized art cleaning sponges. Using the right tools prevents damage and ensures a delicate cleaning process.

3
Perform a Patch Test

Always apply any cleaning method or solution to a small, hidden corner of the painting first. This crucial step verifies that your chosen technique will not harm the paint layers or varnish, preventing irreversible damage.

4
Clean Methodically and Gently

Work slowly and methodically, starting with the least invasive methods like dusting, and progressing only if necessary. Patience and a light touch are paramount to safely removing surface grime without compromising the artwork's integrity.

Understanding Your Oil Painting: A Foundation for Cleaning

Modern abstract painting featuring textured brush strokes in brown and red hues. 
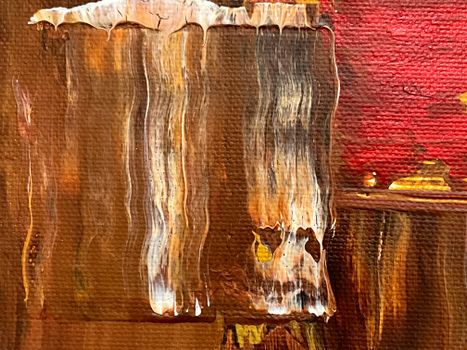
Photo: Steve A Johnson / Pexels
Before you even think about touching your cherished artwork with a cleaning tool, it's absolutely crucial to understand the intricate layers and materials that comprise an oil painting. This foundational knowledge isn't just academic; it's your first line of defense against accidental damage. An oil painting isn't just paint on canvas; it's a complex structure built up over time. At its core, you have the support, typically canvas or wood panel, which can be vulnerable to humidity, temperature fluctuations, and physical impacts. Over this, artists apply a ground layer, often gesso, which prepares the surface for painting. Then comes the oil paint itself, a mixture of pigment and a drying oil (like linseed or poppy oil). The paint layers can vary in thickness and drying time, contributing to the painting's texture and overall stability. Finally, and perhaps most importantly for cleaning purposes, most oil paintings are protected by a varnish layer. This varnish serves multiple purposes: it saturates the colors, provides an even sheen, and, critically, acts as a sacrificial layer that protects the paint from dust, grime, and environmental pollutants. Understanding these layers means you're cleaning the varnish, not directly the paint, in most cases. The age of your painting also plays a significant role. Older paintings, particularly those from the 19th century or earlier, might have brittle paint, aged varnish that has yellowed or cracked, or even previous restoration attempts that used materials incompatible with modern cleaning methods. The condition of the varnish is paramount. If the varnish is significantly cracked, flaking, or appears to be deteriorating, attempting to clean it at home could dislodge paint particles or cause further damage. Similarly, unvarnished paintings, while less common, require an even more delicate approach as you'd be directly interacting with the paint surface. Recognizing these vulnerabilities allows you to choose the least invasive and safest cleaning techniques. For instance, a stable, well-varnished painting from the mid-20th century might tolerate a slightly more robust surface cleaning than a 17th-century masterpiece with a delicate, aged varnish. Always err on the side of caution. If you're unsure about the painting's construction, age, or the stability of its layers, it's far better to consult a professional conservator. They possess the expertise and specialized tools to assess and treat artworks without risk. Remember, the goal of cleaning is preservation, not transformation. A deep understanding of your painting's structure is the first, indispensable step in this delicate process. Consider also the environment where the painting has been displayed. Has it been in a smoky room, near a kitchen, or in a dusty attic? These factors will influence the type and severity of grime accumulated on the surface, guiding your cleaning strategy. For more insights into preserving art, explore resources on art preservation techniques.

Essential Tools and Gentle Techniques for Surface Dust and Grime

Pink powder swirls around a makeup brush against a dark background, showcasing elegance and beauty. 
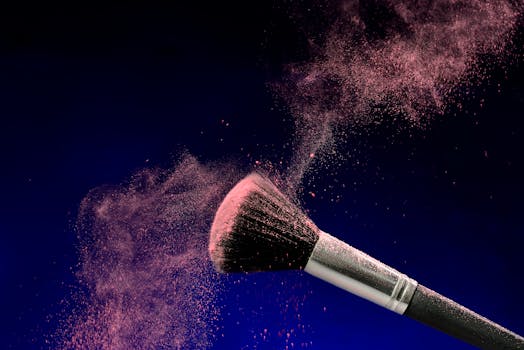
Photo: Viễn Đông / Pexels
Once you've thoroughly assessed your oil painting and understand its composition, it's time to gather the right tools and apply gentle, non-invasive cleaning techniques. The primary objective here is to remove superficial dust and light grime without disturbing the delicate paint or varnish layers. This is often the only cleaning most well-cared-for oil paintings will ever need. Your toolkit should be simple, clean, and specifically chosen for delicate work. First, acquire a very soft, natural-bristle brush. A high-quality cosmetic brush (like a large, fluffy powder brush that has never been used for makeup) or a specialized art cleaning brush is ideal. Avoid stiff brushes, synthetic bristles, or anything that could scratch the surface. The goal is to gently dislodge dust, not scrub. For areas with slightly more stubborn dust or light, non-greasy grime, lint-free cloths are essential. Microfiber cloths can be excellent, provided they are soft, clean, and free of any tags or seams that could scratch. You might also consider artist's sponges, often referred to as 'dry cleaning sponges' or 'smoke sponges.' These are typically made of vulcanized rubber and are incredibly effective at lifting dry soot, dust, and non-oily grime without the use of liquids. They work by absorbing particulate matter onto their surface. When using the soft brush, hold the painting securely, or place it on a clean, flat surface. Begin by gently sweeping the brush across the painting, working in small sections and following the contours of the brushstrokes. Use a very light touch, almost as if you're tickling the surface. You're not trying to scrub anything off; you're merely coaxing dust particles to release. Periodically tap the brush against a clean surface or use a soft cloth to remove accumulated dust from the bristles, preventing redistribution onto the painting. For areas with slightly more embedded dust or dry, powdery grime, the dry cleaning sponge comes into play. Cut a small, clean piece of the sponge to work with. Gently dab and roll the sponge across the surface of the painting. Do not rub or scrub. The sponge will pick up dirt as it rolls. As soon as a section of the sponge becomes visibly dirty, cut off that piece and use a fresh, clean section. This prevents transferring grime back onto the artwork. Always work in small, manageable areas, and monitor the sponge for dirt pickup. If you encounter any resistance, stickiness, or if the sponge seems to be affecting the paint or varnish in any way, stop immediately. It's crucial to remember that these methods are for *surface* dust and *dry* grime only. They are not intended for oily residues, smoke damage, or embedded dirt. If after these gentle steps, your painting still appears dull or dirty, it might require more advanced techniques or professional intervention. The mantra for this stage is 'less is more' and 'gentle does it.' Rushing or applying too much pressure can lead to irreversible damage. Always work in a well-lit area so you can clearly see the results of your efforts and any potential issues.

Addressing Stubborn Grime: Advanced At-Home Methods and When to Seek Professional Help

Close-up of an artist's hands holding a paintbrush and tissue paper, ideal for creativity themes. 
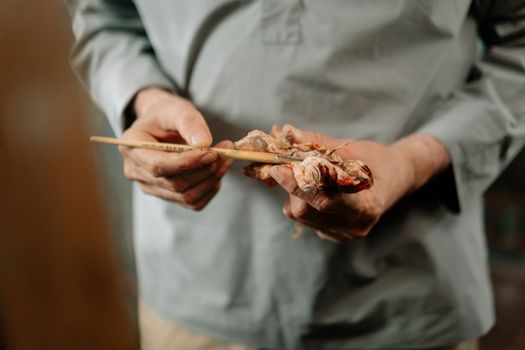
Photo: cottonbro studio / Pexels
While gentle dusting and dry sponge techniques are effective for superficial dirt, some oil paintings accumulate more stubborn grime, such as tobacco smoke residue, cooking grease, or environmental pollutants, that necessitate a more advanced approach. This is where the risk significantly increases, and extreme caution, along with a thorough understanding of the risks, becomes paramount. For very specific, localized, and stable grime that hasn't responded to dry cleaning, some enthusiasts cautiously employ methods involving distilled water or mild, pH-neutral solutions. It is absolutely critical to reiterate: this is not for every painting, and a patch test on an inconspicuous area is non-negotiable. Only proceed if the varnish is stable, uncracked, and you are certain the painting is not unvarnished. One method involves using distilled water and cotton swabs. Dampen a cotton swab (not soaking wet, just barely moist) with distilled water. Gently roll the swab over a small, dirty area. Do not rub. The goal is to lift the grime onto the swab. As soon as the swab shows dirt, discard it and use a fresh one. Change swabs frequently to avoid redistributing grime. Watch for any color coming off onto the swab – this is a red flag indicating you are removing paint or varnish, and you must stop immediately. This technique is only suitable for surface grime that sits *on top* of a robust varnish layer. Another slightly more advanced, but still at-home, approach involves specialized art cleaning gels or solutions, often available from art conservation suppliers. These are typically pH-neutral and designed to be very gentle. However, they are still chemical solutions and require meticulous attention to instructions and extensive patch testing. They are often applied with cotton swabs or very soft cloths and then carefully removed with distilled water. The principle remains the same: gentle application, immediate removal of dirt, and constant vigilance for any adverse reactions. It is crucial to understand that these 'advanced' at-home methods carry significant risks. Over-wetting can cause water damage to the canvas or paint layers, especially if there are existing cracks. Harsh rubbing can abrade the varnish or even the paint. Incorrect solutions can permanently alter the painting's appearance or chemical stability. The biggest challenge for the amateur is distinguishing between surface grime on the varnish and grime that has penetrated the varnish or is part of the paint layer itself. When to seek professional help? The answer is almost always when in doubt. If your painting exhibits any of the following, a professional conservator is your only safe option: significant yellowing or darkening of the varnish that obscures the painting, deep-seated grime that doesn't lift easily, flaking or unstable paint, cracks that extend through the paint layer, signs of mold or mildew, significant smoke damage, or if the painting is of high monetary or sentimental value. Professional conservators possess specialized knowledge of art chemistry, advanced cleaning agents, and techniques like solvent cleaning or varnish removal, which should never be attempted at home. They can perform intricate cleaning processes under controlled conditions, often using microscopy to ensure no damage occurs. They can also address underlying structural issues or perform re-varnishing. Attempting to clean a valuable or damaged painting yourself could drastically reduce its value and lead to irreversible harm. For further reading on the importance of professional art care, explore resources on professional art restoration. Remember, the goal is to preserve the artwork, not risk its integrity for a DIY cleaning project.

Preventative Care and Common Mistakes to Avoid When Cleaning Oil Paintings

The best cleaning is often no cleaning at all, which highlights the critical importance of preventative care for your oil paintings. By implementing thoughtful preventative measures, you can significantly reduce the need for active cleaning, thereby minimizing the risk of damage. Start by controlling the environment where your artwork is displayed. Oil paintings thrive in stable conditions. Maintain a consistent temperature, ideally between 68-72°F (20-22°C), and a relative humidity of 45-55%. Fluctuations can cause the canvas to expand and contract, leading to cracks in the paint layers. Avoid hanging paintings in direct sunlight, which can cause colors to fade and varnish to yellow prematurely. Similarly, keep them away from heat sources like radiators, fireplaces, or air conditioning vents. Protect paintings from dust by framing them with glass if appropriate (though this is more common for works on paper or unvarnished oil paintings, as varnished oils need to breathe). For varnished paintings, regular, very gentle dusting with a soft, natural-bristle brush is your best defense against accumulation. If possible, avoid displaying paintings in high-traffic areas prone to splashes, or in kitchens where grease and cooking fumes can quickly accumulate on the surface. Now, let's address common mistakes that amateur cleaners often make, which can lead to irreversible damage: * **Using Household Cleaners:** This is perhaps the most egregious error. Windex, furniture polish, dish soap, or any other household cleaner contains harsh chemicals, abrasives, or solvents that are completely incompatible with oil paint and varnish. They can strip varnish, dissolve paint, leave sticky residues, or cause discoloration. * **Excessive Moisture:** Water is generally an enemy of oil paintings, especially if it gets behind the paint layers or into cracks. While distilled water can be used sparingly and carefully on stable, varnished surfaces, over-wetting, or using tap water (which contains minerals and impurities), can cause swelling, staining, or mold growth. * **Rubbing or Scrubbing:** Oil paint and varnish layers are delicate. Aggressive rubbing, especially with abrasive cloths or sponges, can physically remove layers of paint or varnish, leading to irreversible damage and loss of artistic detail. * **Ignoring Patch Tests:** Skipping the patch test is akin to playing Russian roulette with your artwork. Every painting is unique, and what works for one may harm another. Always test any cleaning method on an inconspicuous area first. * **Using the Wrong Tools:** Stiff brushes, paper towels, or colored cloths can scratch surfaces or transfer dyes. Stick to soft, natural-bristle brushes and lint-free, white cotton or microfiber cloths. * **Attempting Varnish Removal:** Removing old, yellowed varnish is a highly specialized task requiring specific solvents, knowledge of paint chemistry, and a conservator's steady hand. Attempting this at home will almost certainly result in paint loss. * **Lack of Patience:** Cleaning an oil painting is a slow, methodical process. Rushing can lead to mistakes and damage. Work in small sections, take breaks, and observe the painting's reaction carefully. * **Not Knowing When to Stop:** Recognizing the limits of your expertise and the painting's stability is crucial. If you encounter any resistance, flaking, or discoloration, or if the grime is simply too stubborn for gentle methods, stop immediately and consult a professional. By prioritizing preventative care and diligently avoiding these common pitfalls, you can ensure your oil paintings remain vibrant and intact for years to come, minimizing the need for risky, active cleaning.

Comparison

Cleaning MethodBest forRisk LevelDIY Feasibility
Soft Brush DustingLoose dust, cobwebsVery LowHigh
Dry Cleaning SpongeDry soot, light surface grimeLowHigh
Distilled Water (Cotton Swab)Stable varnish, light sticky grimeMediumMedium (with extreme caution)
Specialized Art Gels/SolutionsSpecific, heavier surface grime (professional recommended)HighLow (professional preferred)
Professional ConservationYellowed varnish, significant grime, damage, valuable artVery Low (for painting)N/A

What Readers Say

"This guide completely demystified how to clean oil paintings at home. I used the soft brush and dry sponge method on my grandmother's old portrait, and the difference is incredible. It looks so much brighter now, and I felt confident every step of the way because of the detailed instructions."

Eleanor Vance · Boston, MA

"I was hesitant to touch my antique oil painting, but this article provided such clear, step-by-step advice. The emphasis on patch testing saved me from a potential mistake. My painting now has a clarity I haven't seen in years, all thanks to learning how to clean oil paintings at home properly."

Mark Jenkins · Seattle, WA

"Following these instructions for how to clean oil paintings at home, I successfully removed years of dust and light kitchen grime from a landscape piece. The colors are more vibrant, and I didn't cause any damage. The advice on when to call a professional was particularly helpful and reassuring."

Sarah Chen · Austin, TX

"The initial dusting and dry sponge techniques worked wonders on my smaller paintings. For a more heavily soiled piece, the guide correctly advised professional help, which I appreciated. It's a fantastic resource for understanding the limits of at-home cleaning."

David Miller · Chicago, IL

"As an artist myself, I sometimes have older pieces that need a refresh. This guide on how to clean oil paintings at home is invaluable. It reinforces best practices and introduces gentle methods I hadn't considered, ensuring my work stays pristine."

Maria Rodriguez · Los Angeles, CA

Frequently Asked Questions

What is the safest way to remove dust from an oil painting?

The safest method is to use a very soft, natural-bristle brush (like a new, clean cosmetic powder brush or a specialized art brush). Gently sweep the brush across the surface, working in small sections and periodically tapping the brush to remove accumulated dust. Avoid pressing hard or using harsh brushes.

Can I use water to clean my oil painting?

Generally, it's best to avoid water on oil paintings. However, for very stable, varnished paintings with light, sticky grime, a cotton swab very lightly dampened with distilled water can be used with extreme caution and after a thorough patch test. Never use tap water or soak the painting.

How do I clean a very old or valuable oil painting at home?

For very old or valuable oil paintings, especially those showing signs of flaking paint, cracking, or significant discoloration, it is strongly recommended to consult a professional art conservator. Attempting to clean such pieces at home carries a very high risk of irreversible damage.

Is it worth cleaning an oil painting myself, or should I always hire a professional?

For minor surface dust and light, dry grime, DIY cleaning with gentle methods (like soft brushing or dry cleaning sponges) can be effective and cost-efficient. However, for deep-seated grime, smoke damage, yellowed varnish, or any painting with significant value or damage, professional conservation is always the safest and most worthwhile investment to protect the artwork's integrity and value.

What's the difference between cleaning and restoring an oil painting?

Cleaning an oil painting primarily involves removing surface dirt, dust, and grime from the varnish layer. Restoration, on the other hand, is a much more comprehensive process that can include varnish removal, repair of tears or paint loss, inpainting, and structural repairs. Restoration is always performed by trained professionals.

Who should clean oil paintings?

Anyone with a stable, varnished oil painting suffering from only light surface dust or dry grime can attempt gentle at-home cleaning using the methods outlined here, provided they proceed with extreme caution and perform patch tests. For anything beyond this, or for valuable artworks, a professional art conservator should be engaged.

What are the risks of cleaning an oil painting incorrectly?

Incorrect cleaning can lead to irreversible damage, including paint loss, abrasion of the varnish, discoloration, water damage, chemical reactions, and reduction of the painting's aesthetic and monetary value. The most common risks involve using harsh chemicals, excessive moisture, or abrasive tools.

Are there any new technologies for cleaning oil paintings?

While traditional methods remain foundational, conservators are continually exploring advanced techniques. These include laser cleaning for specific types of grime, specialized micro-emulsions, and gels that offer more controlled and targeted cleaning, all of which require professional expertise and specialized equipment, not for at-home use.

Empower yourself with the knowledge to care for your treasured artworks. By understanding how to clean oil paintings at home safely and effectively, you can preserve their beauty for future generations. Remember, patience and caution are your best tools in this delicate process.

Topics: how to clean oil paintings at homeoil painting cleaning guiderestore old oil paintingsafe art cleaningdusting oil paintingsremove smoke from painting
Leo List
Brampton weed
Adultwork